Making Colors Pickable
The Fundamentals
Let There Be Light!
Lesson 4: Making Colors Pickable
- How Waves Make Color
- The Anatomy Of a Wave
- The Not So Scary Science
- Wavelength
- Amplitude
- Frequency
- How Waves Travel
In this lesson, you will learn what light is, where it comes from, and why it becomes a spectrum when it’s exposed to a prism.
The Color Wheel
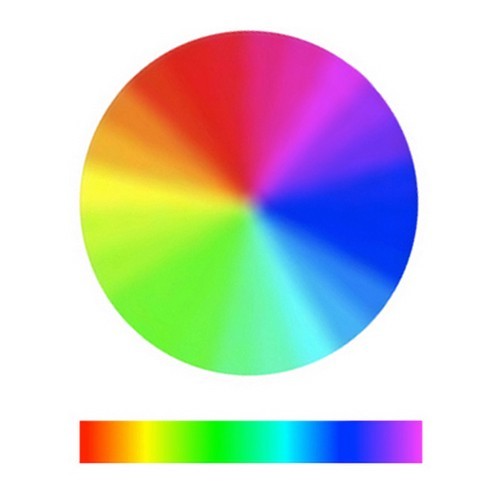
Let’s look at this picture and forget about the infrared and ultraviolet light thing for the moment. We’re just dealing with the “visible spectrum” of colors the human eye can see. If we chop off the colors we can’t see, we have the spectrum we all know and love, with red on the left and violet on the right. Now imagine that instead of the spectrum following a straight horizontal line from left to right, we joined the left end of the spectrum to the right end so that it forms a circle. If we do that, the spectrum becomes the color wheel! The red end joins to the violet end to form a seamless continuum of hues. If you think of it as a circular spectrum, you eye should always think of red as being on the left end of the spectrum, and violet as being on the right end of the spectrum. Not because I say so, but because that’s how the spectrum actually looks. Color wheels are the most common type of color picker, and you are likely to find one in every graphics program.
So to pull this all together, when light is broken down with a prism, you get the spectrum. The bands of color you see on the spectrum are created by the wavelength, amplitude and frequency of the light waves shining through the spectrum. The longer, slower waves are on the red end at the left of the spectrum. The faster-moving waves are on the violet end at the right end of the spectrum. So when you adjust the sliders on your color pickers, you are controlling where you are in that color banding, selecting the particular waves you need.
How Color Pickers Work
Rather than roaming around aimlessly on the color wheel, Adobe created the Color panels to allow you to control exactly where you are and what you see. In the example below, you’ll see the RGB panel. In the example on the left, with all the sliders pushed all the way to the left, the color chip is Black. The bars turn red, green and blue on the right side, but are black on the left. But in the example on the right, with the sliders pushed all the way to the right, the opposite happens. The color chip turns white, and the bars turn cyan, magenta and yellow on the left side, but are white on the right side.
That’s because if you look on the color wheel above, you’ll see that cyan is directly opposite red. Magenta is directly opposite green. And yellow is directly opposite blue. That information is going to be incredibly helpful as you begin to correct and balance color in your images. Because being directly opposite each other makes them inversely proportional, as in you can’t change one without affecting the other.

If for example, you have an image that suffers from a preponderance of red, now that you know that red and cyan are opposite each other on the color wheel, you can subtract that red from the image, which will leave behind cyan, balancing the color. If your image has a magenta color cast on it, you can balance it by adding more green, its opposite on the color wheel. And if your image has a yellow cast to it, you correct that by adding more blue. No guesswork. That’s how you fix it. The sliders are giving you all the clues you need by changing the bar color to its opposite on the the color wheel. You just have to know how to “read” them.
You might notice the colors on the bars moving as you drag the slider. This is Photoshop (or whatever program you’re using) moving around the color wheel for you, changing the color of the other sliders to show you how your changes are affecting the other two sliders, based on the color model you’ve chosen. In the case of these RGB sliders, Photoshop is adjusting the color of the remaining two sliders, moving the color wheel either towards the left of its position on the spectrum, or towards the right end, depending on which direction you’re dragging the slider.
But if the sliders were HSB (hue, saturation, brightness), the sliders would allow you to adjust the saturation (color intensity) or the brightness, changing color accordingly. All the Color sliders work this way. Each will change according to the color model in use. So expect the HSB sliders to be different from HSL sliders, which will be different from the CMYK and Grayscale sliders.

